-
[unity] unity C# 에서 javascript 함수 호출하기 또는 javascript 에서 unity C# 함수 호출하기unity/unity 공부 2022. 10. 6. 11:48
유니티로 작업한 결과물을 WebGL 방식으로 빌드 시켜서 내보낼 수 있습니다.
그러면 css, html 파일등이 나오게 되는데요. 이 파일들을 변경해서 직접 버튼을 만들어 C# 스크립트 에서 선언한 함수를 호출할수 있고
이와 반대로 C# 스크립트 에서 javascript 를 호출할수도 있습니다.
제가 참고한 사이트는 unity docmentation 입니다.
https://docs.unity3d.com/kr/2021.3/Manual/webgl-interactingwithbrowserscripting.html
Interaction with browser scripting - Unity 매뉴얼
웹용 콘텐츠를 빌드할 때 웹페이지의 다른 요소와 통신해야 할 수 있습니다. 또는 Unity 에디터가 현재 기본적으로 노출하지 않는 웹 API를 사용하여 기능을 구현하고 싶을 수 있습니다. 두 가지
docs.unity3d.com
두 방법을 분리 해서 각각 정리 하겠습니다.
1. javascript 에서 unity C# 스크립트 함수를 호출하는 방법
제가 작업한 상황을 간략하게 말씀드리면
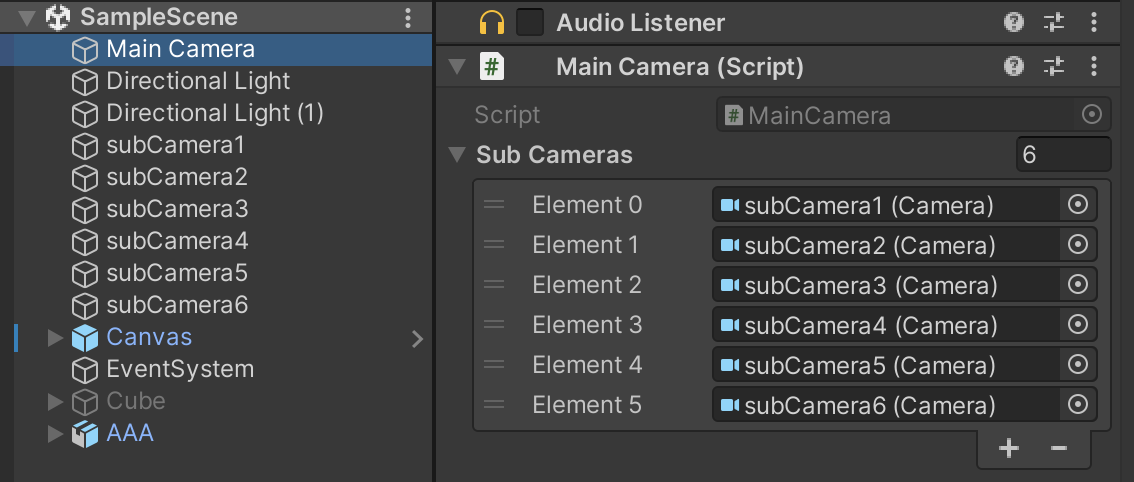
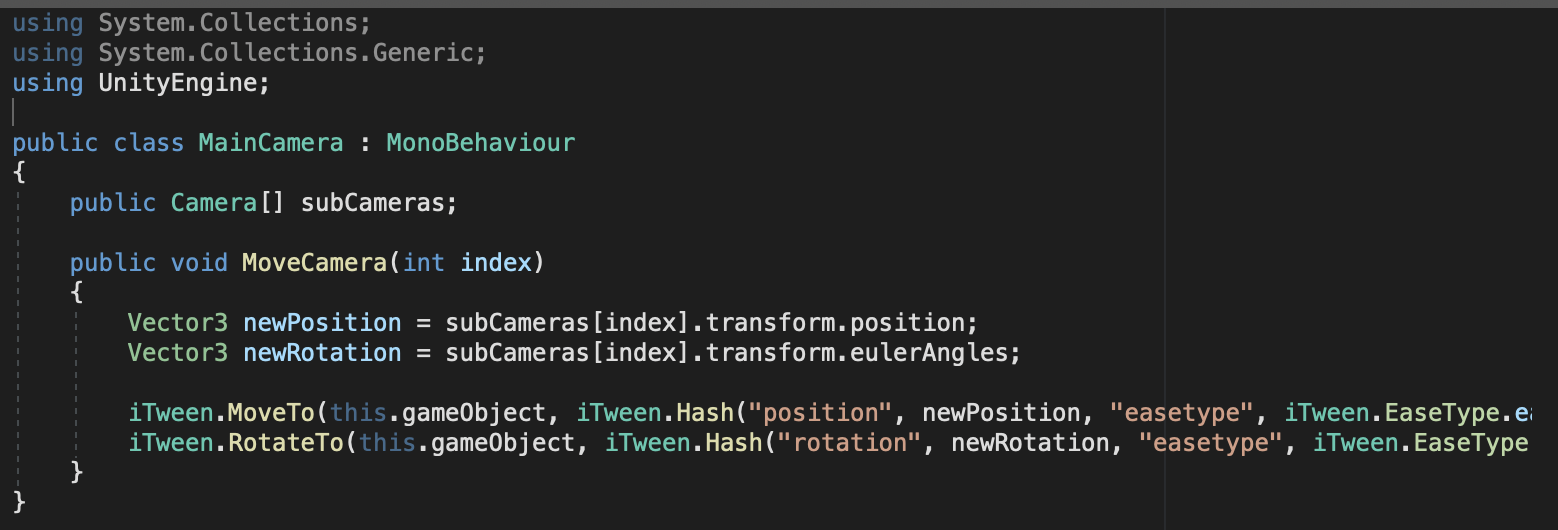
MainCamera 클래스에서 MoveCamera에 parameter 를 넣고 함수를 호출하면 메인 카메라가 parameter 번호에 해당하는 서브카메라로 이동하게 됩니다.
< 유니티 스크립트 >
public class MainCamera : MonoBehaviour
{
    public Camera[] subCameras;

    public void MoveCamera(int index)
    {
        Vector3 newPosition = subCameras[index].transform.position;
        Vector3 newRotation = subCameras[index].transform.eulerAngles;

        iTween.MoveTo(this.gameObject, iTween.Hash("position", newPosition, "easetype", iTween.EaseType.easeOutBack, "time", 2.0f));
        iTween.RotateTo(this.gameObject, iTween.Hash("rotation", newRotation, "easetype", iTween.EaseType.easeOutBack, "time", 2.0f));
    }
}
< WebGL index.html >
123456789101112131415161718192021222324252627282930313233343536373839404142434445464748495051525354555657585960616263646566676869707172737475767778798081828384858687888990919293949596979899100101102103104105106107108109110111112113114115116117118119120121122123124125126127128129130131132133134135136137138139140141142143144145146147148149150151152153154155156157158159160161162<!DOCTYPE html><html lang="en-us"><head><meta charset="utf-8"><meta http-equiv="Content-Type" content="text/html; charset=utf-8"><title>LPGproject</title><link rel="shortcut icon" href="TemplateData/favicon.ico"><link rel="stylesheet" href="TemplateData/style.css"></head><body><div id="unity-container" class="unity-desktop"><canvas id="unity-canvas" width=960 height=600></canvas><div id="unity-loading-bar"><div id="unity-logo"></div><div id="unity-progress-bar-empty"><div id="unity-progress-bar-full"></div></div></div><div id="unity-warning"> </div><div id="unity-footer"><div id="unity-fullscreen-button"></div><div id="unity-build-title">LPGproject</div></div></div><button class="moveBtn" onclick="clickTest1();">카메라 1 이동</button><br><button class="moveBtn" onclick="clickTest2();">카메라 2 이동</button><br><button class="moveBtn" onclick="clickTest3();">카메라 3 이동</button><br><button class="moveBtn" onclick="clickTest4();">카메라 4 이동</button><br><button class="moveBtn" onclick="clickTest5();">카메라 5 이동</button><br><button class="moveBtn" onclick="clickTest6();">카메라 6 이동</button><br><script>var container = document.querySelector("#unity-container");var canvas = document.querySelector("#unity-canvas");var loadingBar = document.querySelector("#unity-loading-bar");var progressBarFull = document.querySelector("#unity-progress-bar-full");var fullscreenButton = document.querySelector("#unity-fullscreen-button");var warningBanner = document.querySelector("#unity-warning");// Shows a temporary message banner/ribbon for a few seconds, or// a permanent error message on top of the canvas if type=='error'.// If type=='warning', a yellow highlight color is used.// Modify or remove this function to customize the visually presented// way that non-critical warnings and error messages are presented to the// user.function unityShowBanner(msg, type) {function updateBannerVisibility() {warningBanner.style.display = warningBanner.children.length ? 'block' : 'none';}var div = document.createElement('div');div.innerHTML = msg;warningBanner.appendChild(div);if (type == 'error') div.style = 'background: red; padding: 10px;';else {if (type == 'warning') div.style = 'background: yellow; padding: 10px;';setTimeout(function() {warningBanner.removeChild(div);updateBannerVisibility();}, 5000);}updateBannerVisibility();}var buildUrl = "Build";var loaderUrl = buildUrl + "/afb_webgl.loader.js";var config = {dataUrl: buildUrl + "/afb_webgl.data.unityweb",frameworkUrl: buildUrl + "/afb_webgl.framework.js.unityweb",codeUrl: buildUrl + "/afb_webgl.wasm.unityweb",streamingAssetsUrl: "StreamingAssets",companyName: "DefaultCompany",productName: "afb_project",productVersion: "0.1",showBanner: unityShowBanner,};// By default Unity keeps WebGL canvas render target size matched with// the DOM size of the canvas element (scaled by window.devicePixelRatio)// Set this to false if you want to decouple this synchronization from// happening inside the engine, and you would instead like to size up// the canvas DOM size and WebGL render target sizes yourself.// config.matchWebGLToCanvasSize = false;if (/iPhone|iPad|iPod|Android/i.test(navigator.userAgent)) {// Mobile device style: fill the whole browser client area with the game canvas:var meta = document.createElement('meta');meta.name = 'viewport';meta.content = 'width=device-width, height=device-height, initial-scale=1.0, user-scalable=no, shrink-to-fit=yes';document.getElementsByTagName('head')[0].appendChild(meta);container.className = "unity-mobile";// To lower canvas resolution on mobile devices to gain some// performance, uncomment the following line:// config.devicePixelRatio = 1;canvas.style.width = window.innerWidth + 'px';canvas.style.height = window.innerHeight + 'px';unityShowBanner('WebGL builds are not supported on mobile devices.');} else {// Desktop style: Render the game canvas in a window that can be maximized to fullscreen:canvas.style.width = "960px";canvas.style.height = "600px";}loadingBar.style.display = "block";var myGameInstance = null; // 유니티 게임오브젝트 인스턴스 변수 생성 해줌var script = document.createElement("script");script.src = loaderUrl;script.onload = () => {createUnityInstance(canvas, config, (progress) => {progressBarFull.style.width = 100 * progress + "%";}).then((unityInstance) => {loadingBar.style.display = "none";fullscreenButton.onclick = () => {unityInstance.SetFullscreen(1);};myGameInstance = unityInstance; // 유니티에서 받은 인스턴스를 변수에 넣어줌}).catch((message) => {alert(message);});};document.body.appendChild(script);// --- c# 스크립트 함수 호출 영역 시작 ---function clickTest1(){console.log('카메라 1 이동 버튼 클릭!');myGameInstance.SendMessage("Main Camera", "MoveCamera", 0);}function clickTest2(){console.log('카메라 2 이동 버튼 클릭!');myGameInstance.SendMessage("Main Camera", "MoveCamera", 1);}function clickTest3(){console.log('카메라 3 이동 버튼 클릭!');myGameInstance.SendMessage("Main Camera", "MoveCamera", 2);}function clickTest4(){console.log('카메라 4 이동 버튼 클릭!');myGameInstance.SendMessage("Main Camera", "MoveCamera", 3);}function clickTest5(){console.log('카메라 5 이동 버튼 클릭!');myGameInstance.SendMessage("Main Camera", "MoveCamera", 4);}function clickTest6(){console.log('카메라 6 이동 버튼 클릭!');myGameInstance.SendMessage("Main Camera", "MoveCamera", 5);}// --- c# 스크립트 함수 호출하는 영역 끝 ---</script></body></html>cs WebGL 로 빌드된 index.html 에 button tag 를 추가 작성(25 ~ 30번째 줄)
javascript 에 gameObject instance 생성(109, 121 번째 줄), clcickTest 함수 생성(128 ~ 158 번째 줄)
javascript 로 C# 스크립트 함수를 호출할 때 SendMessage() 를 사용하게 되는데, 이 메서드에는 2개 또는 3개의 parameter 를 넣어줘야 합니다.
※ 메서드내에 인자값이 없으면 2개만 사용하면 됩니다.
.SendMessage(objectName, methodName);
.SendMessage(objectName, methodName, value);
위에 사용한 코드로 보면 myGameInstance.SendMessage(); 로 사용하였습니다.
첫번째는 object name 이므로 유니티상에서 스크립트를 사용중인 오브젝트이름을 지정해 주면 됩니다.
메인 카메라에 스크립트를 넣었으므로 메인 카메라 오브젝트 이름인 Main Camera 로 입력합니다.
두 번째는 스크립트 함수명을 입력

세번째는 함수의 parameter 값을 입력
유니티에서 button 을 생성한후 버튼을 누르면 subCameras 배열 번호의 서브카메라로 이동하게 됩니다.
이렇게 작성 완료 하고 빌드 파일을 실행하면 아래와 같은 결과를 확인할 수 있습니다.
※ player setting에서 Resolution and Presentation 탭안에 WebGL Template 을 default 로 해야 html 파일이 위에 코드처럼 나오는것 같습니다.
minimal 이나 PWA 로 선택하신분은 코드가 동일하게 나오지 않네요.
2. unity C# 스크립트 에서 javascript 함수를 호출하는 방법
javascript에서 이미 존재하는 함수를 호출 하는 경우
javascript에 없는 함수를 c# 스크립트로 javascript 함수처럼 동작 하도록 하는 경우
이런 두 가지 경우가 있을 수 있습니다.
unity documentation 에 있는 예시 코드를 작성한 후 .jslib 파일로 저장하고 유니티 Assets 폴더 안에 Plugins 하위 폴더에 저장해야합니다.
파일 이름은 원하시는대로 지정하면 됩니다. 확장자만 잘 지정해주세요.
< MyPlugin.jslib 파일 >
mergeInto(LibraryManager.library, {

  Hello: function () {
    window.alert("Hello, world!");
  },

  HelloString: function (str) {
    window.alert(UTF8ToString(str));
  },

  PrintFloatArray: function (array, size) {
    for(var i = 0; i < size; i++)
    console.log(HEAPF32[(array >> 2) + i]);
  },

  AddNumbers: function (x, y) {
    return x + y;
  },

  StringReturnValueFunction: function () {
    var returnStr = "bla";
    var bufferSize = lengthBytesUTF8(returnStr) + 1;
    var buffer = _malloc(bufferSize);
    stringToUTF8(returnStr, buffer, bufferSize);
    return buffer;
  },

  BindWebGLTexture: function (texture) {
    GLctx.bindTexture(GLctx.TEXTURE_2D, GL.textures[texture]);
  },

});
<unity project 에 저장된 상태 MyPlugin.jslib>

그리고 .jslib 내용을 호출해서 사용할 스크립트 파일 작성해야합니다.
< .jslib 파일 내용을 사용할 스크립트 >
using UnityEngine;
using System.Runtime.InteropServices;

public class NewBehaviourScript : MonoBehaviour {

    [DllImport("__Internal")]
    private static extern void Hello();

    [DllImport("__Internal")]
    private static extern void HelloString(string str);

    [DllImport("__Internal")]
    private static extern void PrintFloatArray(float[] array, int size);

    [DllImport("__Internal")]
    private static extern int AddNumbers(int x, int y);

    [DllImport("__Internal")]
    private static extern string StringReturnValueFunction();

    [DllImport("__Internal")]
    private static extern void BindWebGLTexture(int texture);

    void Start() {
        Hello();

        HelloString("This is a string.");

        float[] myArray = new float[10];
        PrintFloatArray(myArray, myArray.Length);

        int result = AddNumbers(5, 7);
        Debug.Log(result);

        Debug.Log(StringReturnValueFunction());

        var texture = new Texture2D(0, 0, TextureFormat.ARGB32, false);
        BindWebGLTexture(texture.GetNativeTexturePtr());
    }
}
이렇게 작성한 후 호출할 오브젝트에서 스크립트 적용합니다.
여기서는 예제 파일 스크립트를 실행하기 위해서 MainCamera 에 스크립트를 넣었습니다.
스크립트 추가 작업이 완료 되었으면 WebGL 로 빌드합니다.
그러면 아래영상처럼 Hell(), HelloString(), AddNumbers() 등의 함수들이 호출되는것을 확인할 수 있습니다.
유니티 버전마다 사용하는 메서드가 다를 수 있습니다.
아래는 unity documentation 에 명시되어 있는 정보입니다.
※ 2021.2 이상에서 Pointer__stringify()를 UTF8ToString으로 교체함
※ 2020.1에서 unity.Instance가 createUnityInstance로 대체됨
※ 2019.1에서 WebGL 인스턴스의 이름이 gameInstance에서 unityInstance로 변경됨이상으로 unity documentation 를 참고해서 작성한 내용을 마무리 하도록 하겠습니다.
'unity > unity 공부' 카테고리의 다른 글
[unity] DefaultExecutionOrder 란? (0) 2024.07.25 [unity] Scripting Backend란? (2) 2024.07.24 [unity] .meta 파일에 대한 내용 정리 (0) 2023.09.16 [unity] scene 이동 하면 라이트 어두워지는 현상 (0) 2023.08.03 [unity] 유니티 관련 이것저것 공부 (0) 2022.10.14